How to automate Cloudstack operations with the REST API and IAC platforms
You need to go beyond managing your Cloudstack environment via the Cloudstack portal (https://localhost:8080/client). You need to automate your Cloudstack operations by using the Cloudstack REST API (https://localhost:8080/client/api) and Infrastructure As Code (IaC) platforms, such as Terraform. This article will provide guidance on how to automate Cloudstack operations with the REST API and IAC platforms (Infrastructure As Code). Multiple solutions are available, as described in this article.
Solutions
Section titled “Solutions”Configuring the Cloudstack API
Section titled “Configuring the Cloudstack API”You need to know how to automate Cloudstack operations with the REST API and IAC platforms. The following items are required in order to successfully run a REST API call to Cloudstack:
-
URL of the CloudStack server you wish to integrate with.
-
Both the API Key and Secret Key for a Cloudstack account. This should have been generated by the administrator of the cloud instance and given to you.
-
Familiarity with HTTP GET/POST and query strings.
-
Knowledge of either XML or JSON.
-
Knowledge of a programming language that can generate HTTP requests; for example, Java or PHP.
Generate Cloudstack API public and private keys
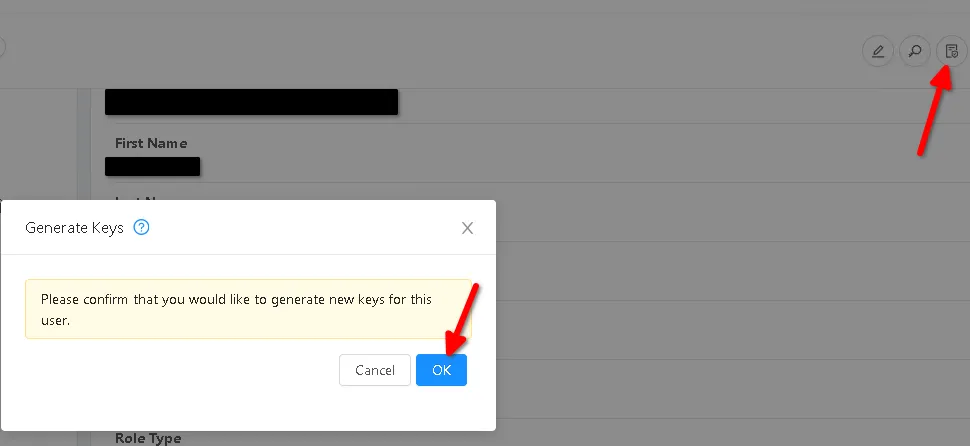
Section titled “Generate Cloudstack API public and private keys”First create a new user/account in the Cloudstack portal. Next, navigate to the user’s page and click on the top right hand icon reading “Generate Keys”. Click “OK” on the prompt.
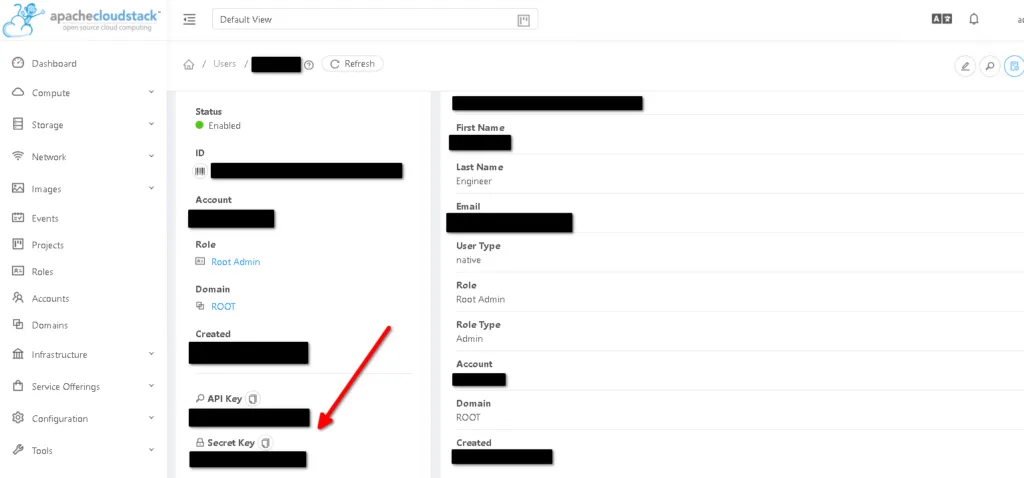
You shall see the generated API key and private key at the bottom of the user’s page in the Cloudstack portal.
Generate Cloudstack API signature with Python2
Section titled “Generate Cloudstack API signature with Python2”Whether you access the CloudStack API with HTTP or HTTPS, it must still be signed so that CloudStack can verify the caller has been authenticated and authorized to execute the command. Make sure that you have both the API Key and Secret Key provided by the CloudStack administrator for your account before proceeding with the signing process. We will use Python2 in interactive mode to generate the required signature, as shown in the CLI commands below.
python2
import urllib2import urllibimport hashlibimport hmacimport base64
baseurl='[your base url here]'request={}request['command']='listUsers'request['response']='json'request['apikey']='[your api key here]'secretkey='[your secret key here]'
request_str='&'.join(['='.join([k,urllib.quote_plus(request[k])]) for k in request.keys()])#The below command will test the generation of the API request stringrequest_str# Output of above command should be like# 'apikey=[your api key here]&command=listUsers&response=json'
sig_str='&'.join(['='.join([k.lower(),urllib.quote_plus(request[k].lower().replace('+','%20'))])for k in sorted(request.iterkeys())])sig=hmac.new(secretkey,sig_str,hashlib.sha1)sig=hmac.new(secretkey,sig_str,hashlib.sha1).digest()sig=base64.encodestring(hmac.new(secretkey,sig_str,hashlib.sha1).digest())sig=base64.encodestring(hmac.new(secretkey,sig_str,hashlib.sha1).digest()).strip()sig=urllib.quote_plus(base64.encodestring(hmac.new(secretkey,sig_str,hashlib.sha1).digest()).strip())#The final sig object holds the signature string
req=baseurl+request_str+'&signature='+sigres=urllib2.urlopen(req)res.read()
Automating Cloudstack with Cloudmonkey
Section titled “Automating Cloudstack with Cloudmonkey”To install Cloudmonkey on an Ubuntu machine, run the following commands.
#Option 1: Install from snapsudo apt updatesudo apt install snapdsudo snap install cloudmonkey
#Option 2: Install via Python PIP2 (PIP3 has a bug), assumes snap is not presentsudo add-apt-repository universesudo apt updatesudo apt install python2curl https://bootstrap.pypa.io/pip/2.7/get-pip.py --output get-pip.pysudo python2 get-pip.pysudo pip2 install cloudmonkey
#Option 3 - RECOMMENDED# Use the latest cloudmonkey (https://github.com/apache/cloudstack-cloudmonkey/releases) which is a complete new re-write in Go. The Python based cloudmonkey won't be maintained anymore.#This example uses the x64 binaries for Ubuntu Linuxwget https://github.com/apache/cloudstack-cloudmonkey/releases/download/6.2.0/cmk.linux.x86-64chmod +x cmk.linux.x86-64sudo mv cmk.linux.x86-64 /bin/cmk#Run cloudmonkey and setup a new profile/bin/cmkset profile pocset apikeyset secretkeyset domainset usernameset passwordsync
#Option 4 - Install the Cloudmonkey Windows client (standalone .exe file)
Consult the Cloudmonkey Getting Started guide at: https://github.com/apache/cloudstack-cloudmonkey/wiki/Getting-Started.
Use the following cmk binary command reference from the official apache github repository of Cloudmonkey (CMK).
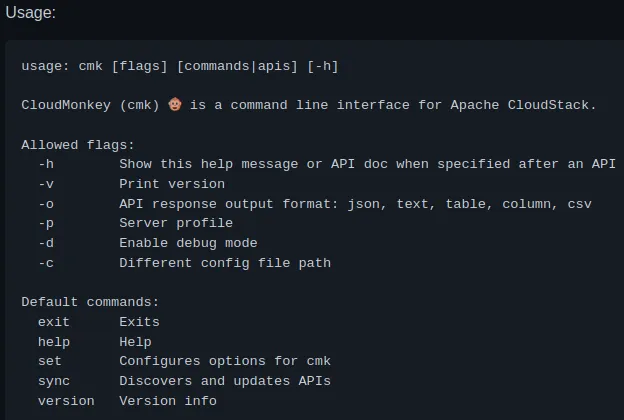
Cmk will create a new config directory under ~/.cmk.
This allows legacy cloudmonkey to be used as well.
Cmk will store server profile specific API cache in the ~/.cmk/profiles directory.
You can run the cmk command with the -p (server profile) parameter. Also you can edit the cmk profile being used by running the “set profile [profilename]” command and then run the “set [parameter] [parameter value]” command to set any of the profile’s parameters, e.g. the API URL, the username and the password of the user authenticating to Cloudstack API.
You should now be able to run cloudmonkey commands as in the example below.
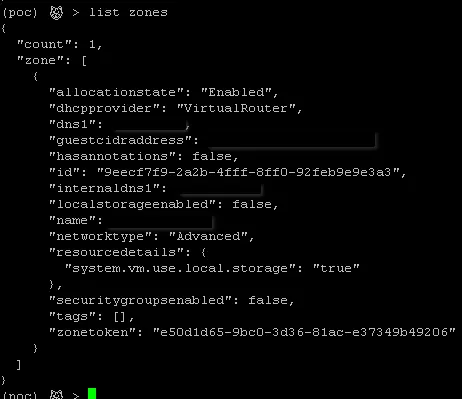
You can choose the output format of Cloudmonkey by setting the corresponding parameter in the command line (XML, JSON, CSV, tabular).
Cloudmonkey commands can also be scripted and then piped to the cloudmonkey executable as in the following example.
cat cmk-script-filelist userslist zonescloudmonkey < cmk-script-fileMore details on Cloudmonkey for Cloudstack operations can be found at:
https://cwiki.apache.org/confluence/display/CLOUDSTACK/CloudStack+cloudmonkey+CLI
The full reference of Cloudstack API methods, which can be used as commands inside CMK is provided at: https://cloudstack.apache.org/api/. For example, the “createNetwork” command reference can be found at: https://cloudstack.apache.org/api/apidocs-4.19/apis/createNetwork.html.
Terraform provider for Cloudstack
Section titled “Terraform provider for Cloudstack”You can manage Cloudstack with various IaC platforms such as Terraform. First you will need to install the Terraform runtime on a server accessible to the Cloudstack management server. Run the commands below on an Ubuntu machine, to install the Terraform runtime.
sudo apt-get update && sudo apt-get install -y gnupg software-properties-common curlcurl -fsSL https://apt.releases.hashicorp.com/gpg | sudo apt-key add -sudo apt-add-repository "deb [arch=amd64] https://apt.releases.hashicorp.com $(lsb_release -cs) main"sudo apt-get update && sudo apt-get install terraform#Test that the Terraform engine is working by running a help commandterraform -helpThere is a Terraform provider for Cloudstack provided by the Apache Foundation. You will need to have a functional Cloudstack API before implementing the Terraform provider for Cloudstack. Terraform basically requires the creation of a few Terraform configuration and state files (.tf and .tfstate extensions) which will provide declarative programming instructions to Cloudstack to manage resources (create, edit, delete). The following diagram provides an understanding of the high-level architecture of Terraform.
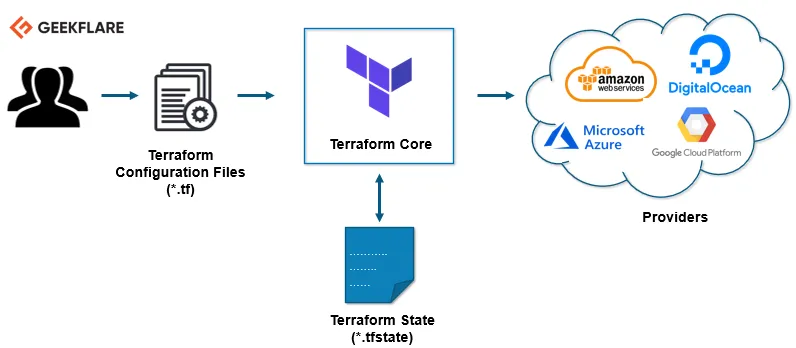
The following Terraform configuration files (.tf) and state files (.tfstate) will need to be created and populated with actual values from your Cloudstack environment. The following sample files provide an example.
main.tf
terraform { required_providers {    cloudstack = {      source  = "cloudstack/cloudstack"      version = "0.4.0"    }  }}provider "cloudstack" {  # Configuration options  api_url    = var.api_url  api_key    = var.api_key  secret_key = var.secret_key}
variable "api_url" {  description = "API URL"  type = string  default = "http://x.x.x.x:8080/client/api"}
variable "api_key" {  description = "API key"  type = string  default = "XXXXXXX"}
variable "secret_key" {  description = "Secret key"  type = string  default = "YYYYYYY"}
cloudstack_network.tf
resource "cloudstack_network" "isolated_net" { name = "CS_ISOLATED_NET" cidr = "[YOUR NETWORK IP HERE]/24" network_offering = "DefaultIsolatedNetworkOfferingWithSourceNatService" zone = "zone01"}cloudstack_template.tf
resource "cloudstack_template" "LinuxKVM" { name = "LinuxKVM" os_type = "Other Linux (64-bit)" zone = "zone01" url = "[template URL here]" format = "QCOW2" hypervisor = "KVM"}cloudstack_instance.tf
resource "cloudstack_instance" "VirtualMachine01" { name = "VM01" service_offering = "Large Instance" template = cloudstack_template.LinuxKVM.id network_id = cloudstack_network.isolated_net.id zone = "zone01" expunge = true}The following Terraform runtime commands can be used to apply the above changes.
terraform initterraform -install-autocompleteterraform plan [options]terraform applyterraform destroy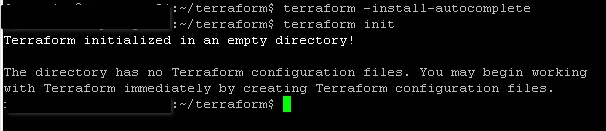
After creating the main.tf in the terraform working directory and running the init command, terraform is ready to communicate with your Cloudstack environment.
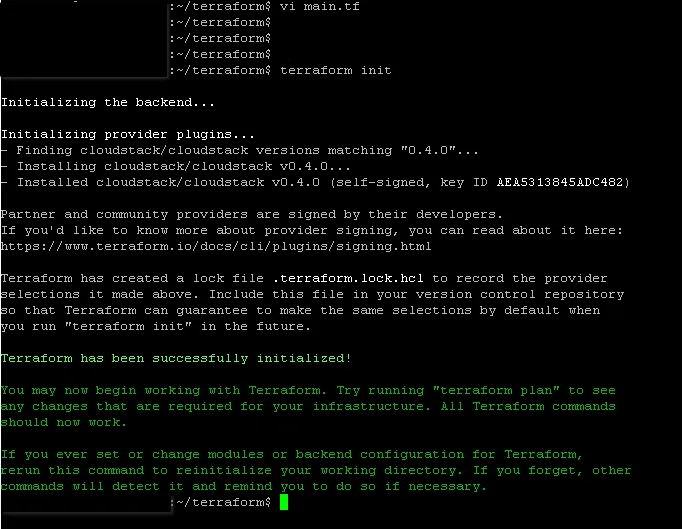
Powershell for Cloudstack
Section titled “Powershell for Cloudstack”Follow the steps below to use Powershell to automate Cloudstack management tasks.
- Download the Cloudstack API module for Powershell which is available in GitHub at https://github.com/schubergphilis/psCloudstack. Copy the downloaded files into the Powershell default modules folder in your Windows computer. This location is C:\Users\[username]\Documents\WindowsPowerShell\Modules\psCloudstack.

- Configure the Powershell execution policy by running the following cmdlets.
Set-ExecutionPolicy RemoteSigned -Scope currentuser#Import the Cloudstack API moduleImport-Module psCloudstackAdd-CSConfig -server [your CS server name] -apikey [your API key here] -secret [your secret key here] -useSSL -SecurePort 443 -UnsecurePort 80#Confirm PSCloudStack configurationget-csconfig#Receive list of available commands in the moduleGet-Command -Module psCloudstack
#Run some test Get commands via the API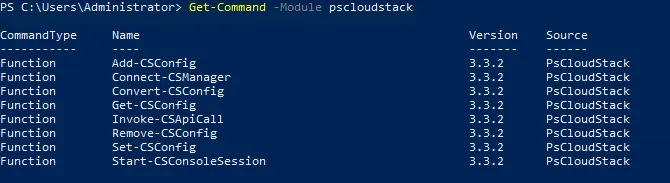
Further documentation of the psCloudstack module can be found at: https://github.com/schubergphilis/psCloudstack. Please note that the psCloudstack Powershell module is not actively maintained and it may not work with the most recent versions of Cloudstack.
Saltstack for Cloudstack
Section titled “Saltstack for Cloudstack”Details on how to automate Cloudstack with Saltstack can be found at:
https://docs.saltproject.io/en/latest/ref/clouds/all/salt.cloud.clouds.cloudstack.html
Ansible for Cloudstack
Section titled “Ansible for Cloudstack”Details on how to automate Cloudstack with Ansible can be found at:
https://docs.ansible.com/ansible/latest/scenario_guides/guide_cloudstack.html
Pulumi for Cloudstack
Section titled “Pulumi for Cloudstack”Details on how to automate Cloudstack with Pulumi can be found at:
https://www.pulumi.com/registry/packages/grafana/api-docs/cloudstack/
Puppet for Cloudstack
Section titled “Puppet for Cloudstack”Details on how to automate Cloudstack with Puppet can be found at:
https://forge.puppet.com/modules/Lavaburn/cloudstack
Chef for Cloudstack
Section titled “Chef for Cloudstack”Details on how to automate Cloudstack with Chef can be found at:
https://supermarket.chef.io/cookbooks/cloudstack
Automating backup and restore of Cloudstack-managed VMs
Section titled “Automating backup and restore of Cloudstack-managed VMs”CloudStack version 4.14 introduces a new Backup and Recovery (B&R) framework which provides CloudStack with users the ability to back up their guest VMs for recovery purposes via third-party backup solutions. The framework abstracts the API commands required for common backup and recovery operations, from the vendor specific commmands needed to perform those actions and provides a plugin model to enable any solution which provides backup and recovery ‘like’ features to be integrated. Currently, the only supported provider is VMware with Veeam Backup and Recovery. Third-party backup vendors can utilize this framework to integrate their solution with Cloudstack for backup and restore automation. More details can be found at: http://docs.cloudstack.apache.org/en/latest/adminguide/backup_and_recovery.html.
Sources on how to automate Cloudstack operations with the REST API and IAC platforms
Section titled “Sources on how to automate Cloudstack operations with the REST API and IAC platforms”-
https://cwiki.apache.org/confluence/display/CLOUDSTACK/CloudStack+cloudmonkey+CLI
-
https://docs.cloudstack.apache.org/en/latest/developersguide/dev.html
-
https://github.com/ZConverter-samples/oci_terraform/blob/main/README.md
-
https://registry.terraform.io/providers/cloudstack/cloudstack/0.4.0
-
https://blogs.apache.org/cloudstack/entry/apache-cloudstack-terraform-provider-v0
-
https://github.com/ZConverter-samples/oci_terraform/blob/main/README.md
-
https://www.shapeblue.com/automating-infrastructure-with-cloudstack-and-terraform/
-
https://kb.leaseweb.com/products/elastic-compute/managing-apache-cloudstack-api-and-automation
-
https://docs.cloudstack.apache.org/projects/archived-cloudstack-getting-started/en/latest/dev.html